


The Blog
Amazon KDP Ads Keywords That Are Proven to Sell
How to Use Helium 10 to Find Ad Keywords and Launch Your Campaign
Running Amazon KDP ads without the right keywords is one of the fastest ways to burn through your budget without seeing a single sale.
Most authors either guess at keywords, copy what they think their competitors are using, or rely on Amazon's automatic targeting and hope for the best. The problem with all of those approaches is the same: you have no way of knowing whether those keywords are actually generating sales before you spend money on them.
That is what makes Helium 10 different from other research tools. It does not just tell you how many people are searching for a keyword. It tells you whether that keyword is actively getting sales, which means you are building your ad campaign on data that has already been validated by the market.
In this guide, I am walking you through exactly how to use Helium 10 to find proven ad keywords using two methods, and then how to set up a low cost Sponsored Products campaign from start to finish.
This is a follow-up to my earlier guide on keyword research and crafting your book title and subtitle. If you have not read that one yet, I recommend starting there first, then coming back here when you are ready to run ads.
Why Keyword Sales Data Changes Everything

Most keyword tools give you search volume and competition levels, and those metrics matter. But for ad campaigns specifically, what you really need to know is whether a keyword is converting into actual purchases.
A keyword with 10,000 monthly searches means nothing if those searching for it are not buying.
Helium 10 surfaces keyword sales data directly inside Cerebro and Magnet, so you can see which keywords are driving purchases for the books already ranking for them.
That transforms your keyword list from a collection of guesses into a shortlist of terms that have already proved themselves in the market. For a new ad campaign on a limited daily budget, that distinction is everything.
Setting Up Helium 10 for Ad Keyword Research
Sign up for Helium 10 here to get the latest exclusive discount, and install their Chrome extension before getting started.
There are two methods I use to build a strong ad keyword list, and I always recommend using both together to get the most comprehensive results.
Method one is reverse engineering bestselling books in your niche to find the keywords they are already using for their ads.
Method two is using the Magnet tool to find related keywords tied to your book's topic or niche.
Together, these two approaches give you a keyword list that covers both what is already working for your competitors and what the broader market is actively searching for.
Method One: Reverse Engineering Bestselling Books With Cerebro
Go to Amazon and type your book's main topic into the search bar. Before you press enter, Helium 10 will display related keywords alongside their search volume trends.
This is worth paying attention to, because a trending keyword with low competing products is a strong signal worth noting before you even begin your research.
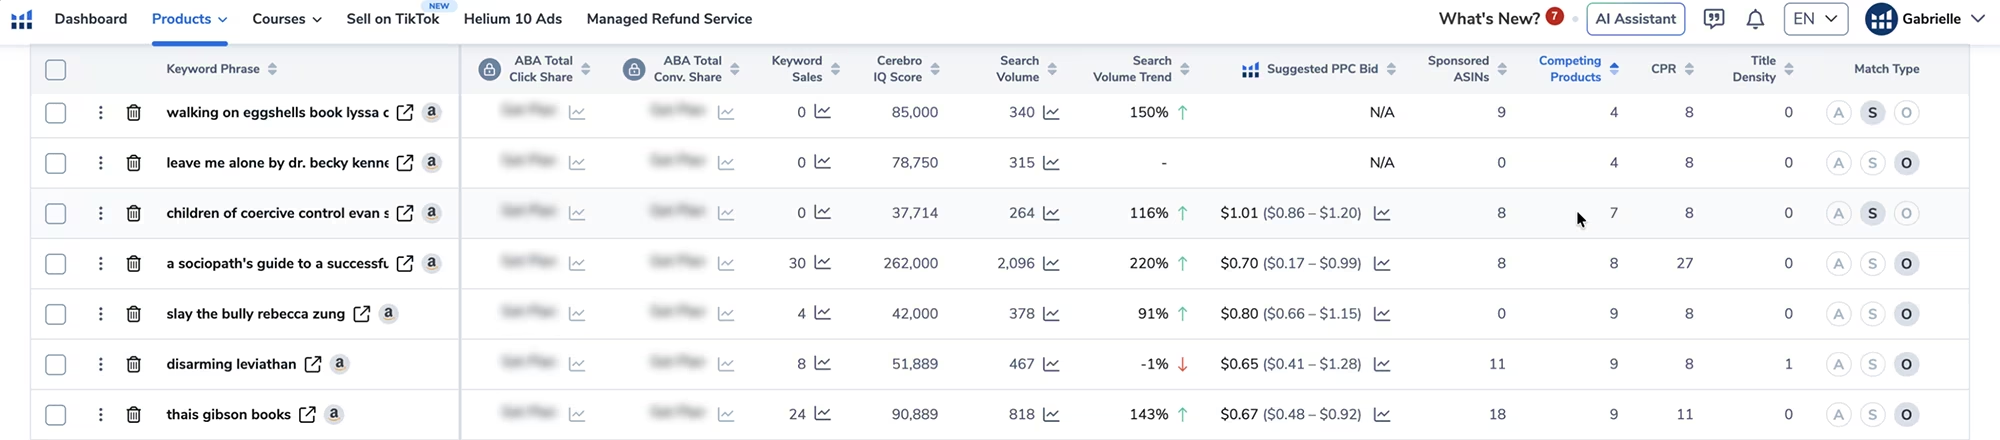
Click on your chosen keyword to view the results, then sort by bestsellers. Click Analyze Products and sort the book list by ASIN Sales, because you want books that are actively selling, not just ranking.

Select up to ten relevant books with strong sales numbers, and prioritise the ones running sponsored ads since those are the books already investing in the keywords you want to find.
Once you have your selection, press the Run Cerebro button. Cerebro will pull in the ASINs of those books and surface all the keywords associated with them.
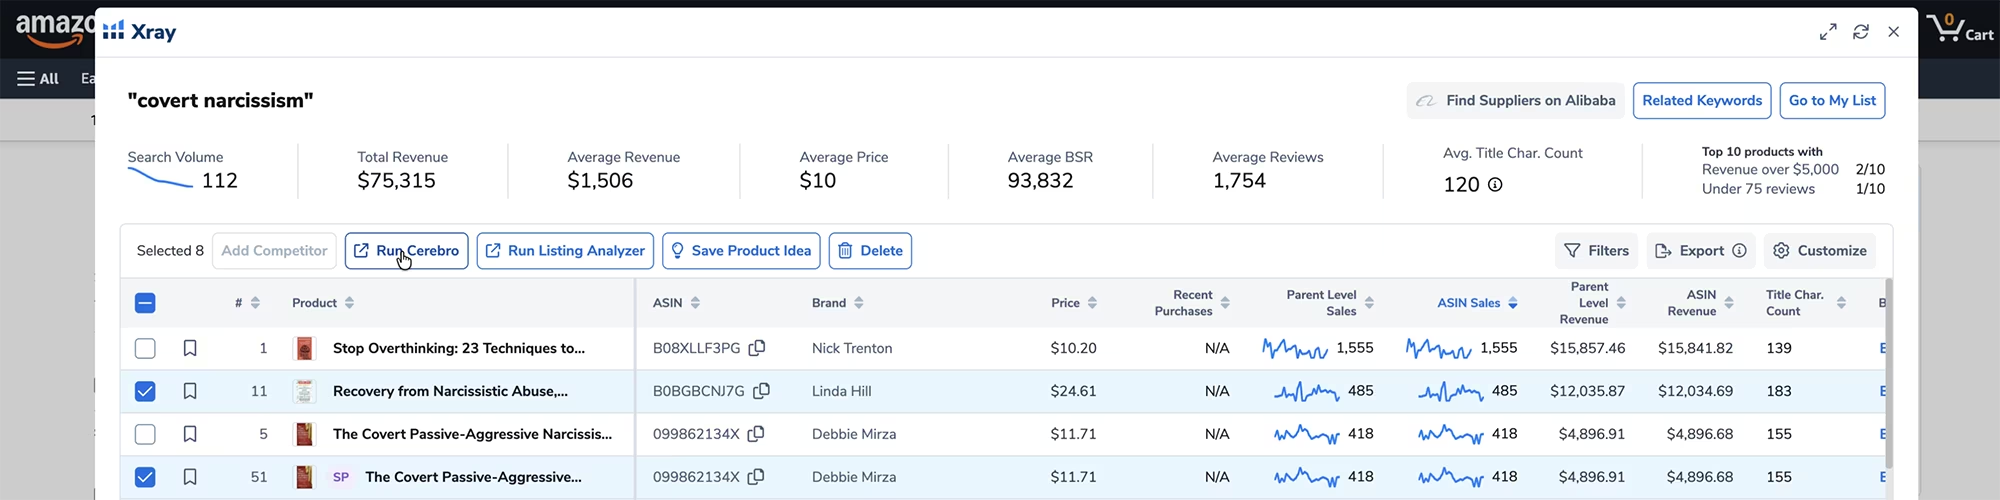
For a search on covert narcissism, for example, this returned over 2,200 related keywords, with more than 1,000 ranking organically and 245 running as paid ads.
Filtering Down to the Keywords That Matter
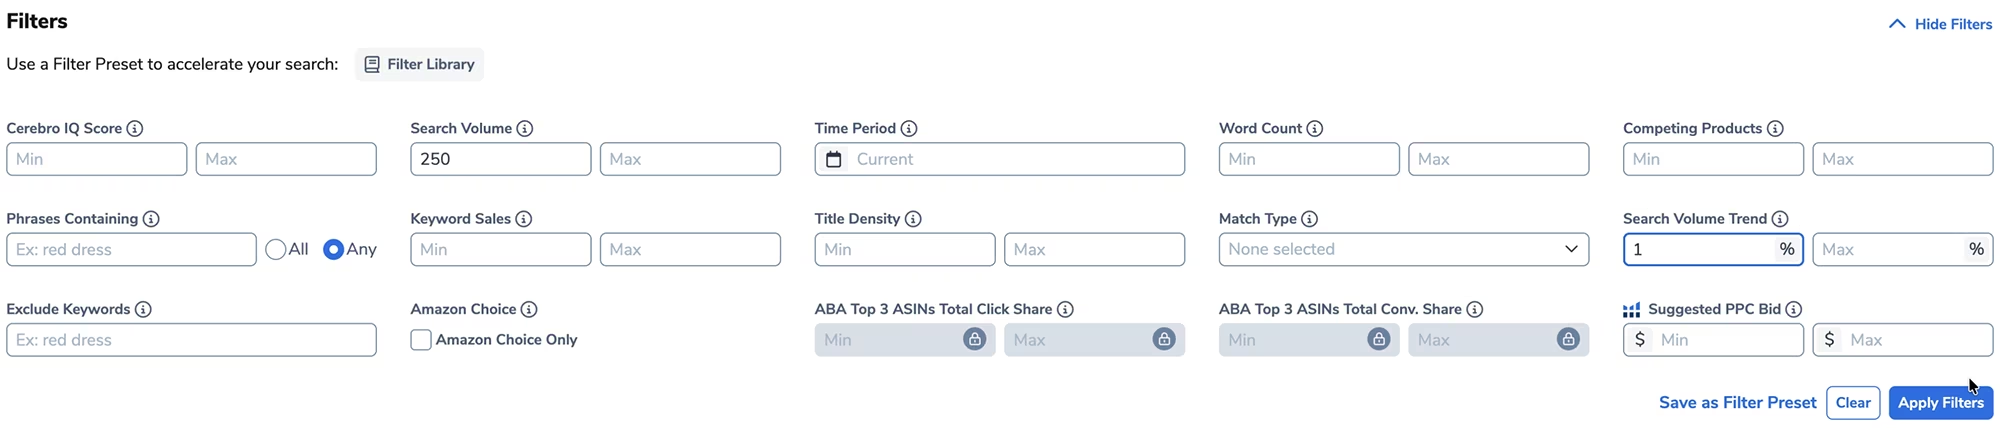
Select the option to exclude variations so Cerebro only shows the keywords these books are actually using, then press Get Keywords.
From there, set a minimum search volume of 250 to filter out low-traffic terms. This alone can cut a list of thousands down to a few hundred genuinely useful keywords.

Now sort by Keyword Sales and look for the terms with the most active sales that are directly relevant to your book.
One important thing to flag here: the keyword "free books" will often appear near the top of this list with impressive sales numbers. Do not use it. People searching for free books are not in a buying mindset, and that keyword will drain your ad budget on clicks that never convert.

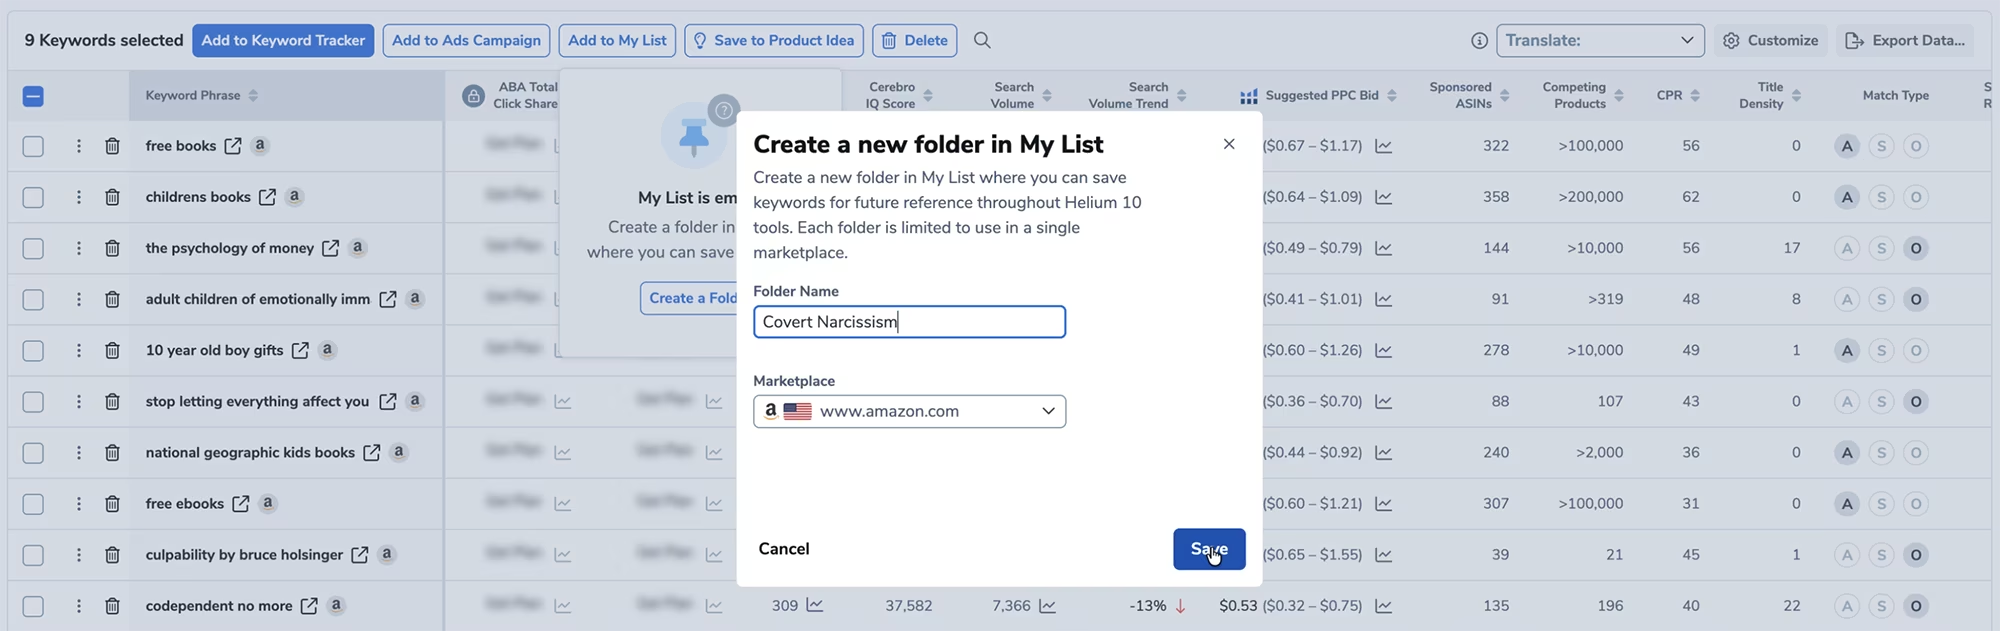
Once you have selected your first batch of relevant keywords, press Add to My List and create a folder labelled with your book's niche or topic so you can find everything easily later.
Sorting by Sponsored ASINs, Search Volume Trend and Competing Products
Next, sort the keyword list by Sponsored ASINs. This column shows you which keywords the sponsored books in your niche are actively bidding on for their ads, which makes it a very direct window into what is already working in your category. Select the most relevant keywords that also show activity in the Keyword Sales column, and add them to your existing folder.

Then sort by Search Volume Trend to find keywords that are currently gaining momentum. Trending keywords are worth targeting early because competition tends to be lower before a term becomes widely recognised. Select the most relevant ones and add them to your list.
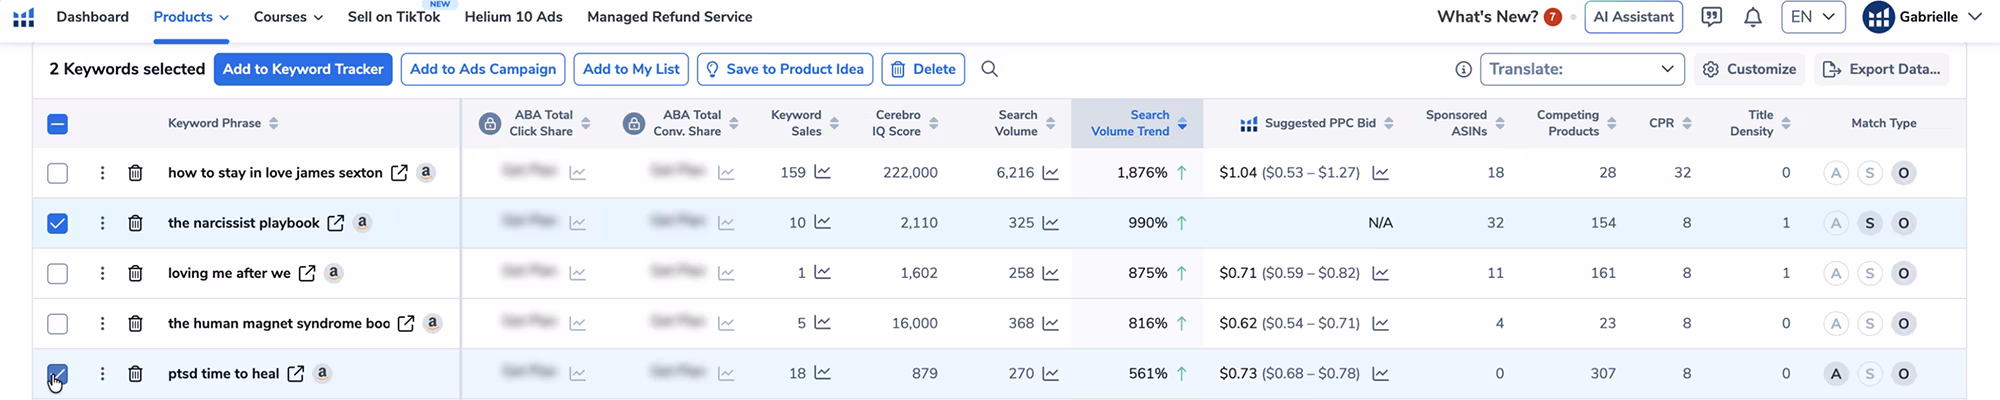
You can also sort by Competing Products to find low competition terms with active keyword sales. These can be some of the most valuable keywords in your entire list because they give you a realistic path to visibility without needing a large budget.
One rule that applies across every sorting method: only select keywords that are genuinely relevant to your book. Using unrelated keywords to chase volume is something Amazon penalises, and in serious cases it can result in removal from KDP entirely. If a keyword includes another author's name, skip it.
Method Two: Finding Related Keywords With Magnet
Once you have finished your reverse engineering research, head to the Helium 10 dashboard and open the Magnet tool, which is now integrated into Cerebro.
Type your book's niche, topic, or main keyword, and press Get Keywords. This surfaces a broader set of related keywords based on the topic itself rather than specific competitor ASINs, which means it often uncovers terms your reverse engineering missed.

Filter the results by setting a minimum Search Volume of 250 and a Search Volume Trend of 1% so you are only seeing keywords with current momentum.
From there, sort by Keyword Sales, Sponsored ASINs, and Search Volume Trend the same way you did in method one, and add the most relevant terms to your existing folder.
Refining Your Final Keyword List
Once both methods are complete, go to the top menu, select Products, and choose My List: Keywords. This is where all your selected keywords are waiting.
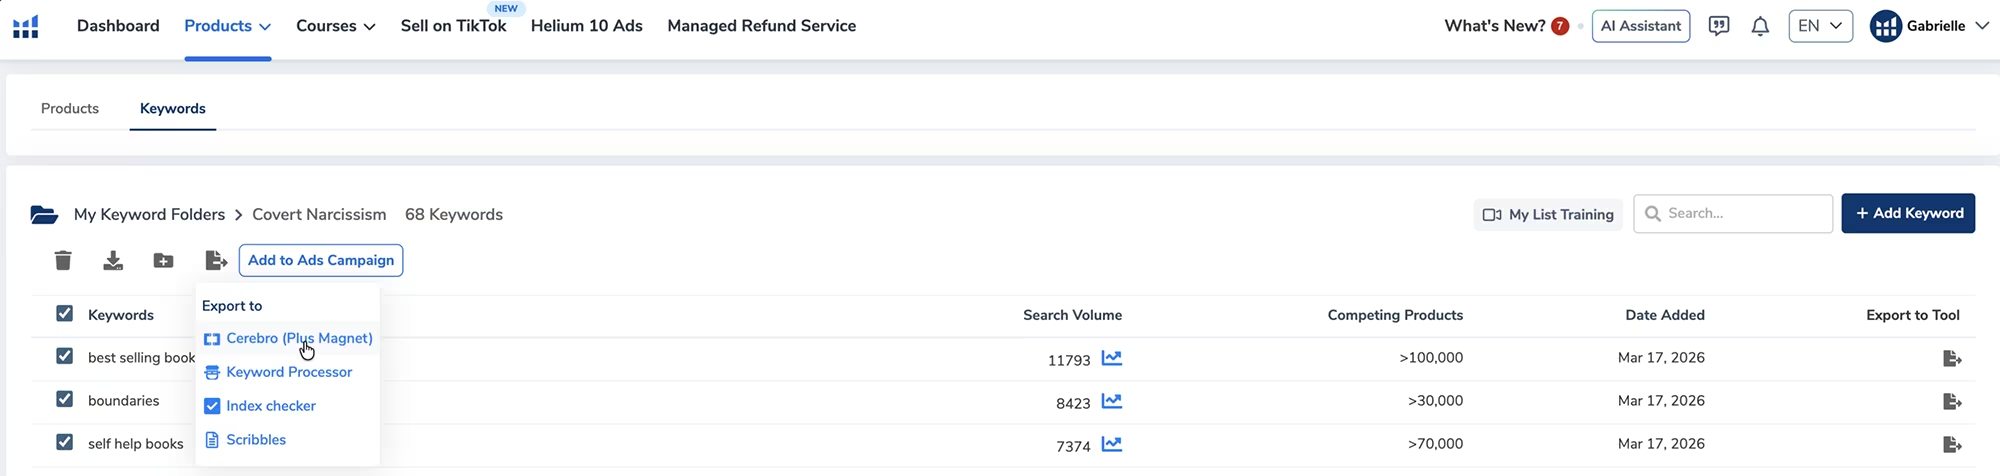
Select them all and export back to Cerebro, then filter by Keyword Sales to a minimum of 1, to eliminate any terms that showed promise in research but are not actually driving purchases. Apply that filter and your list will shrink.
Finally, apply a Search Volume Trend filter of 1% to remove any keywords that are no longer gaining momentum. After both filters, you will typically be left with a much tighter list of highly validated keywords. That is exactly what you want.

For an Amazon KDP ad campaign, anywhere between 10 and 50 keywords is more than enough. Export the final list as an Excel sheet and set it aside for the campaign setup.
Setting Up Your Amazon KDP Sponsored Products Campaign
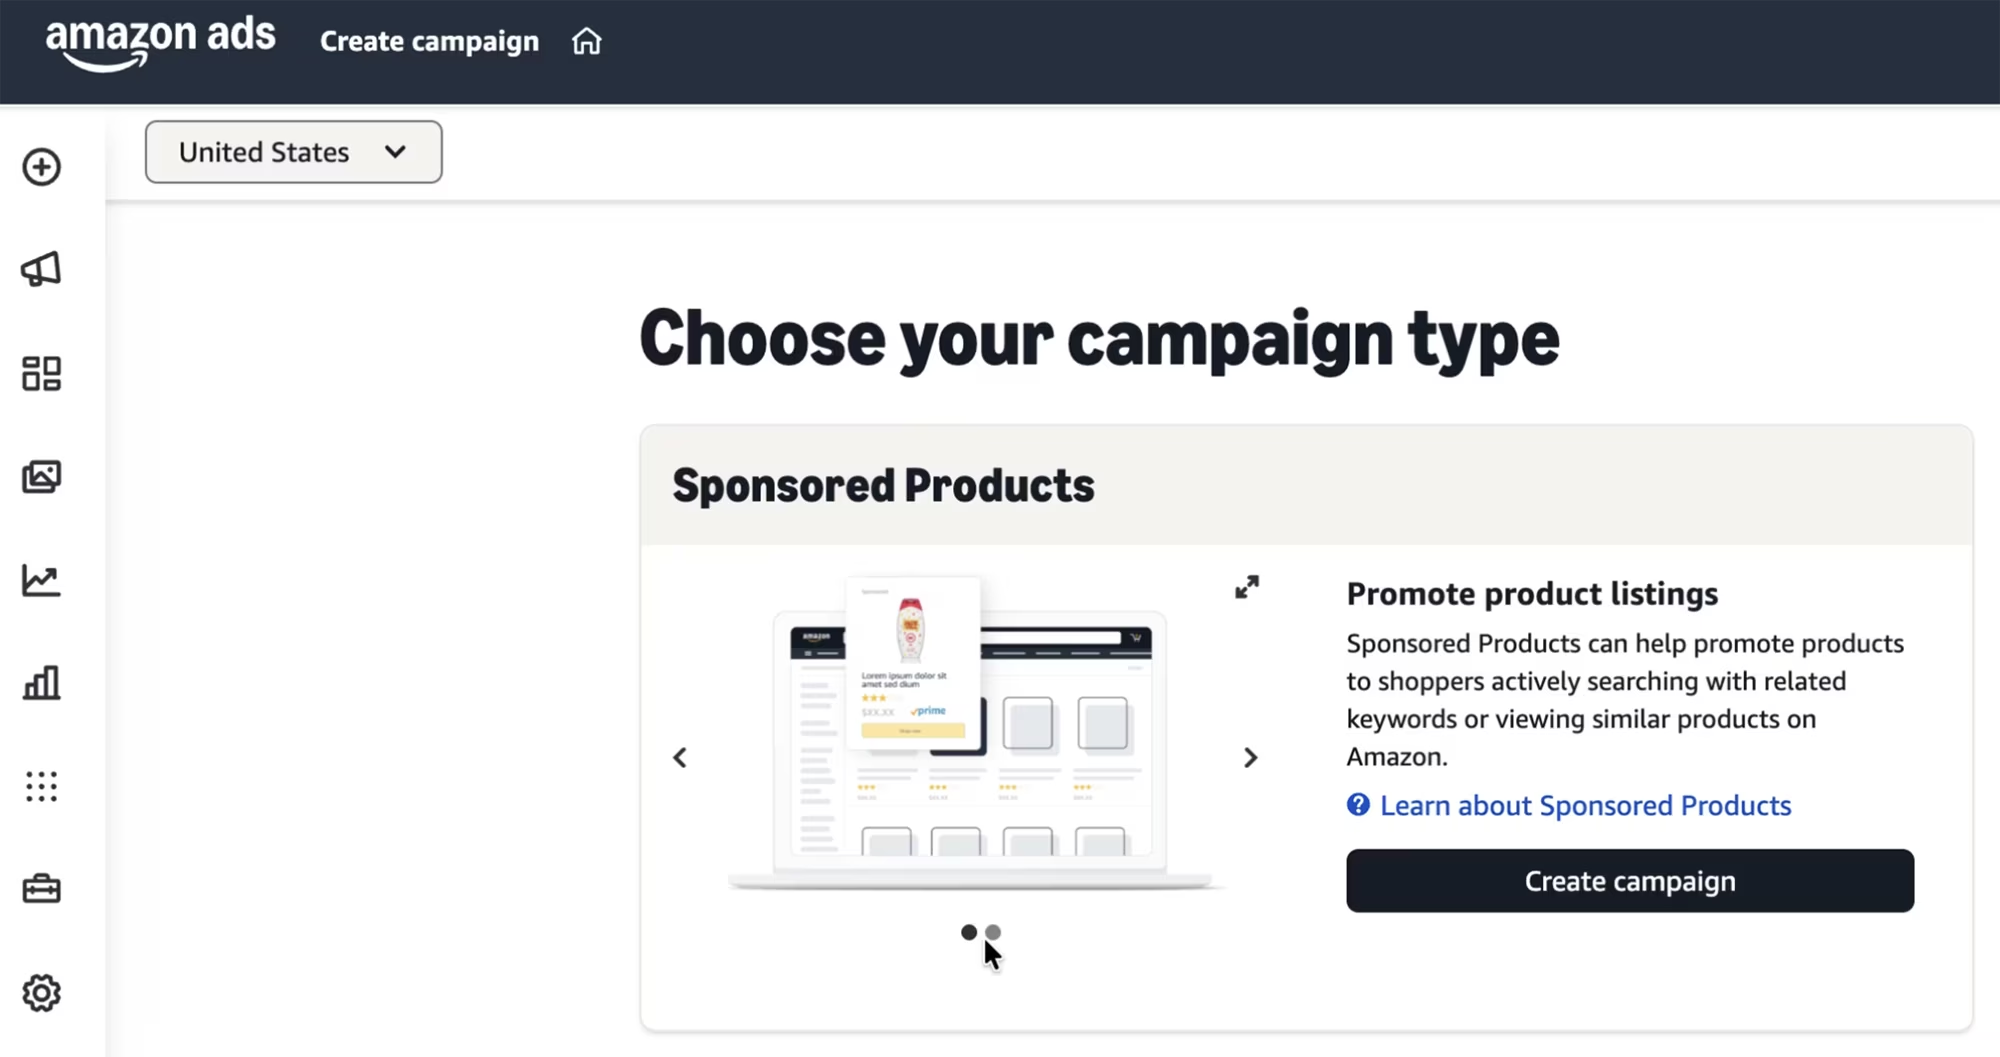
Sign in to your Amazon KDP account and go to the Marketing tab. Select your market and press Go to Amazon Ads, then select Create Campaign. Choose Sponsored Products as your campaign type and click Create Campaign.
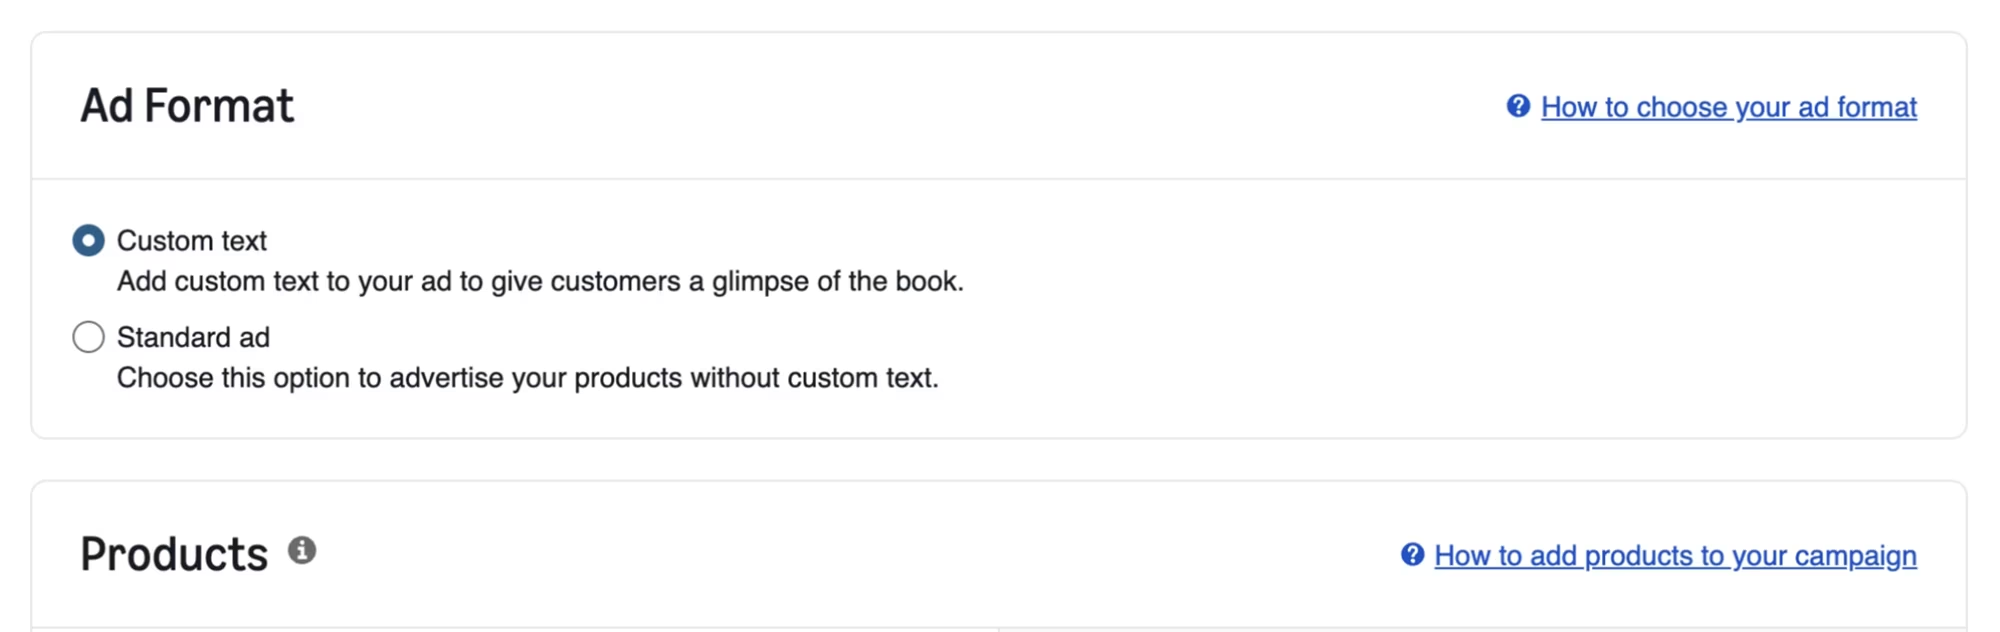
For the ad format, choose Custom Text, which allows you to write your own ad copy rather than letting Amazon generate it automatically.
Select your book across all available formats, paperback, hardcover, and e-book, unless you want to run separate campaigns for each. For targeting, choose Manual Targeting and then select Keyword Targeting. This is where your Helium 10 keyword list comes in.
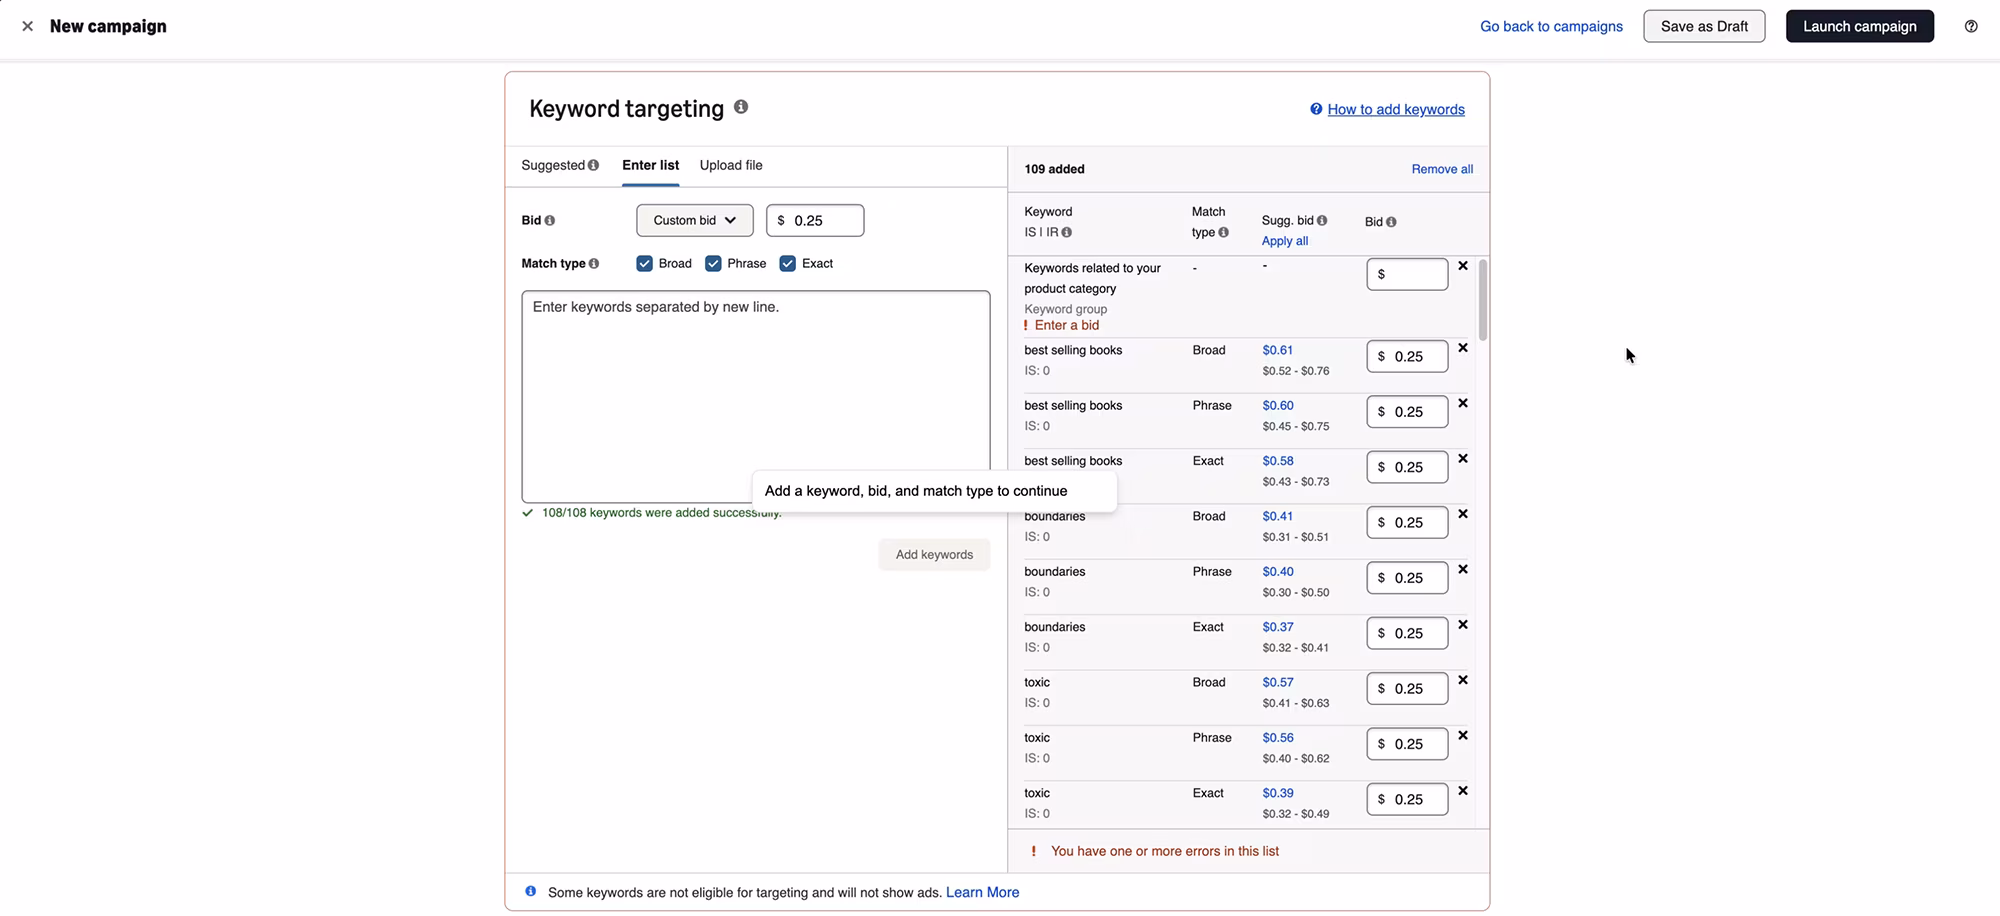
Setting Your Bid Before Adding Keywords
Before you paste in your keyword list, set your bid first. It is easy to forget this step and messy to fix afterward.
Keep the match type set to Broad, Phrase, and Exact so your keywords cover the full range of how people might search for your topic. Then open your Excel sheet, copy your keywords, paste them into the Enter List field, and press Add Keywords.
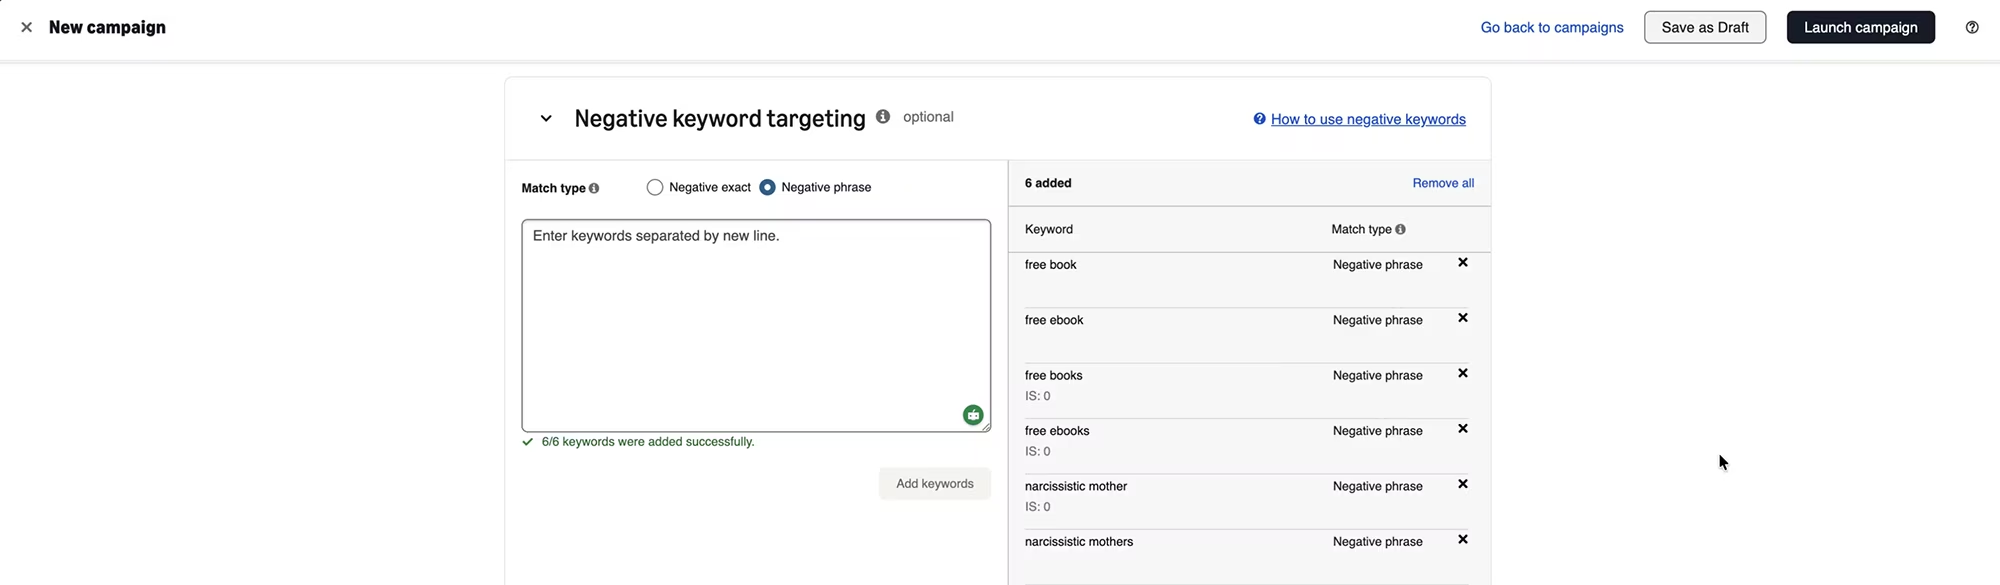
Adding Negative Keywords to Protect Your Budget
Expand the Negative Keyword Targeting section and add the terms you do not want your ad to appear for. Choose Negative Phrase so that even variations of those terms are filtered out.
This is one of the most important steps for keeping your ad spend efficient, because it stops your book from being shown to audiences who are unlikely to buy.
For a covert narcissism book, this means adding terms like "free books" and keywords related to subcategories the book does not cover, such as narcissistic mothers, if that is not the specific topic.
Even if a keyword like "free books" technically generates clicks, the conversion rate will not justify the cost, and precise targeting is always a better long-term strategy than broad reach.
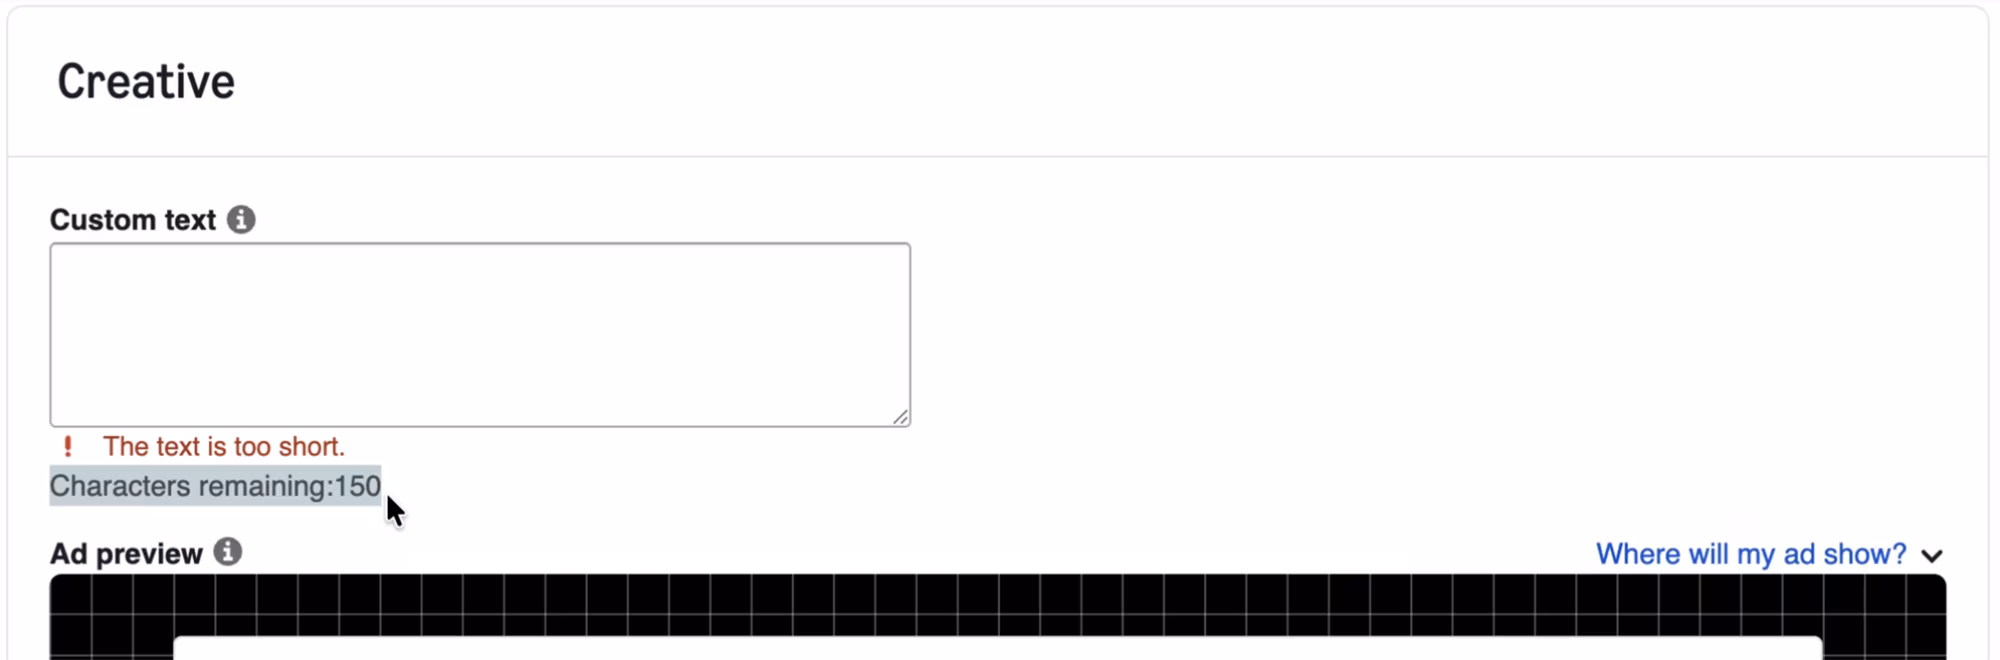
Writing Your Ad Creative
In the creative section, you have 150 characters to write the text that will appear with your ad.
I use ChatGPT to draft this, which I cover in more depth in my guide on setting up KDP ad campaigns, click here to read that one.
Keep the copy focused on the reader's problem and what the book delivers.
Campaign Settings and Daily Budget
For campaign bidding strategy, always choose Dynamic Bids Down Only. This setting ensures Amazon never spends more than your specified bid per click, and it will often spend less, which is a meaningful advantage when you are testing a new campaign on a tight budget.
Do not add any bid adjustments, as those can push your costs higher on certain days without a guaranteed return.
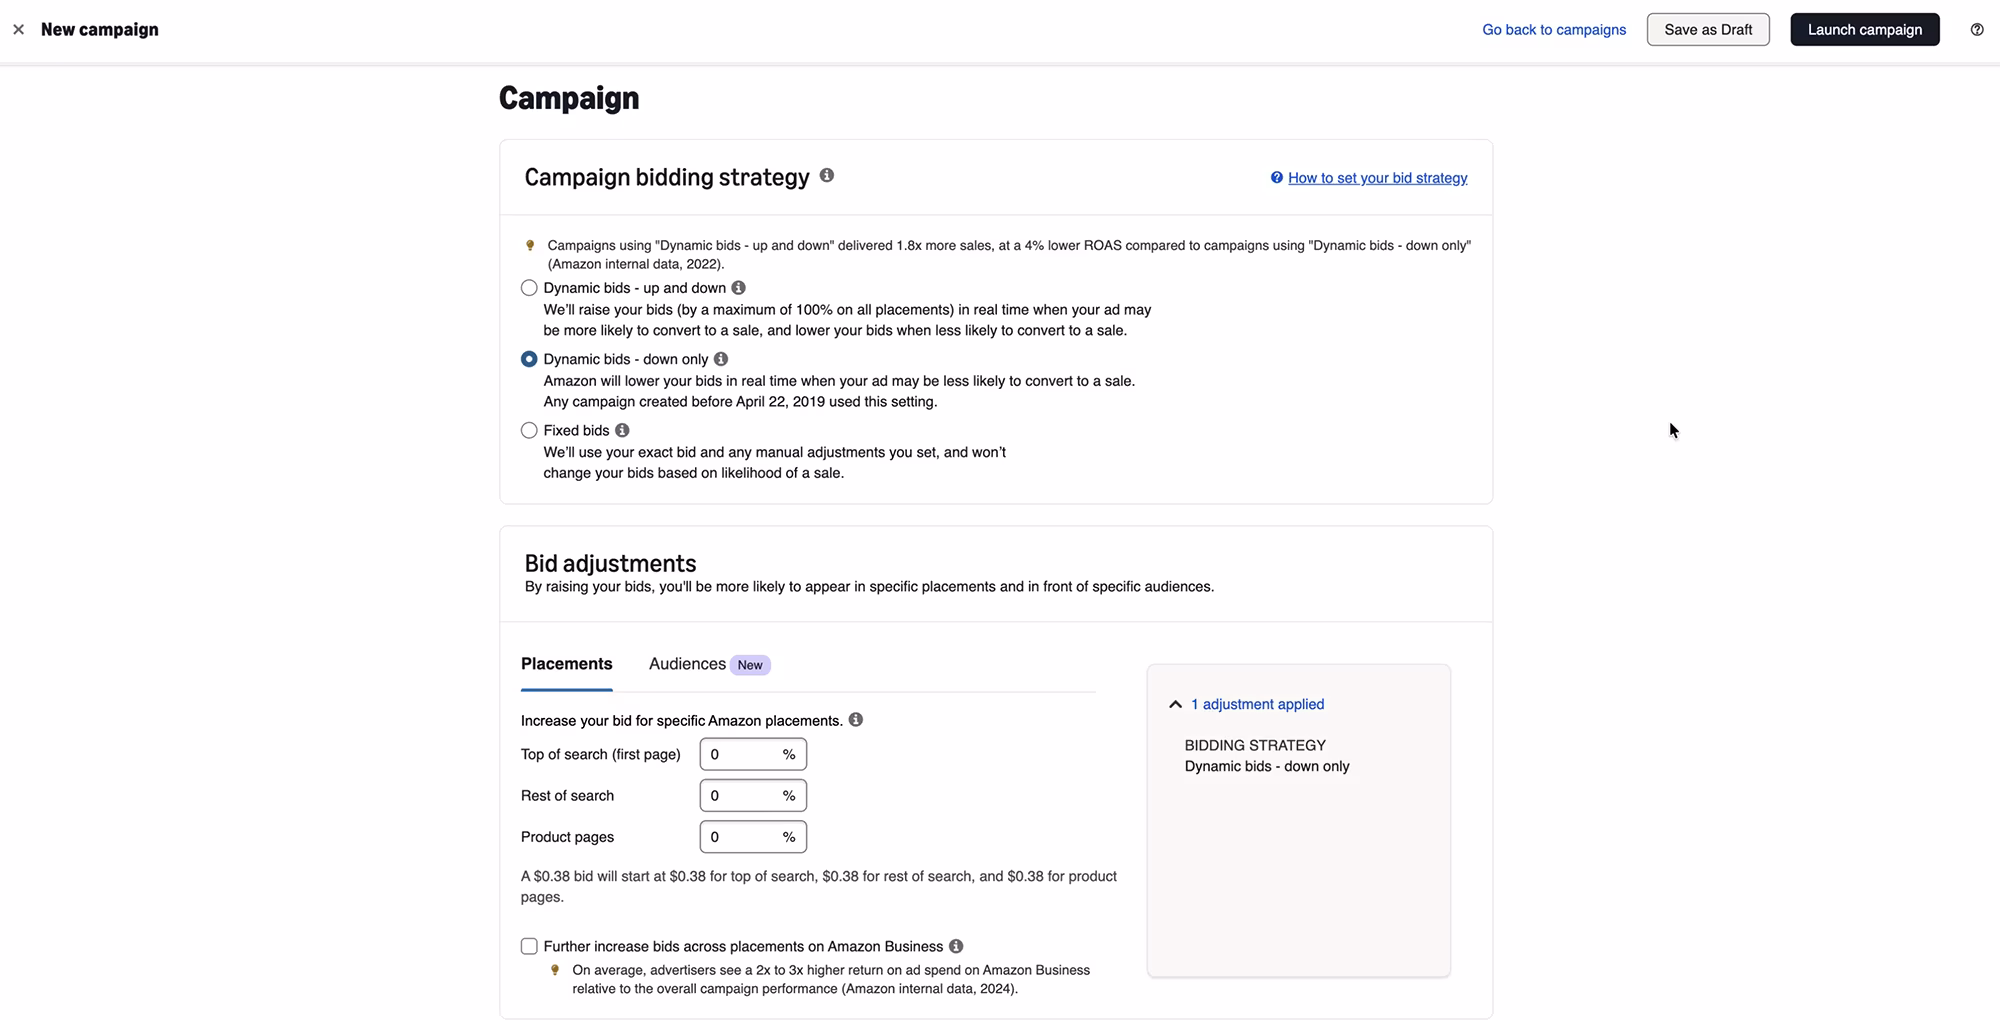
Set a descriptive campaign name so you can identify it easily when you are managing multiple campaigns later. Schedule the start date a few days out and set no end date so it runs as ongoing. You can pause or cancel it at any time after launch.
Start with a daily budget of $2. This is intentionally conservative because the goal at this stage is to test which keywords are performing before committing more spend.
Once the data shows which keywords are converting, you can scale the budget with confidence rather than guessing. Run the campaign in the markets you have set up for your book, and deselect any automated options that adjust bids on high traffic days.
Press Launch Campaign, review any flagged errors before confirming, and your campaign will be live for the date you selected!
Conclusion & Quick Recap

Finding the right ad keywords before you spend a single dollar is what separates a profitable KDP ad campaign from one that quietly drains your budget with nothing to show for it.
Helium 10 shows keyword sales data, not just search volume, which means you know a keyword is converting before you bid on it
Reverse engineering bestselling books with Cerebro reveals the exact keywords your most successful competitors are using for their ads
The Magnet tool broadens your research beyond competitor ASINs to surface related keywords tied to your book's topic
Filtering by Keyword Sales and Search Volume Trend at the end of your research ensures your final list only contains terms that are active and validated
Negative keywords are just as important as your target keywords; they protect your budget from irrelevant clicks that will never convert
Starting with a small daily budget lets you test keyword performance before scaling, which is far more efficient than launching big and hoping for the best
Dynamic Bids Down Only keeps Amazon from exceeding your bid, giving you cost control from day one
Next Steps: Take Action Now
You now have everything you need to build a keyword list grounded in real sales data and launch a low cost campaign that targets the right readers from the start. Here are your next steps:
Sign up for Helium 10 and install the Chrome extension
Search your book's topic on Amazon, sort by bestsellers, and use Analyze Products to find books with strong ASIN sales
Select up to ten relevant books and run them through Cerebro using the Run Cerebro button
Sort keywords by Keyword Sales, Sponsored ASINs, Search Volume Trend, and Competing Products, adding the most relevant from each
Use Magnet (now part of Cerebro) to find additional related keywords tied to your book's topic and add them to your folder
Export your full list back to Cerebro and filter by Keyword Sales and Search Volume Trend to finalise your keyword list
Set up a Sponsored Products campaign in Amazon KDP with Manual Targeting, Custom Text, Dynamic Bids Down Only, and a small starting daily budget
Add negative keywords before launching to protect your budget from irrelevant traffic
Useful Resources
Helium 10. Exclusive discounted pricing using my link! The all-in-one tool suite for Amazon sellers and KDP authors with keyword research, listing optimization, and market analytics.
Gemsy. Get reviews for your KDP books safely. Works for all book types including low-content.
BookVillage. The safest e-book review platform for high-content Kindle ebooks. Try free for 30 days with two months at a reduced price.
100 Covers. Get a professional book cover designed for you, for a very low cost! Use code GABRIELLE for 30% off.
Visit this page with my complete list of tried and true, proven and curated collection of tools for Amazon KDP!
Disclaimer: As an Amazon Influencer and affiliate marketer, I may earn a commission on purchases made through my links at NO extra cost to you.
This content is educational only, results vary and are not typical, and no earnings are guaranteed.
You are responsible for your own financial outcomes. Please read my Terms and Conditions and Privacy Policy for more details.
Free eBooks!
And get access to other free downloads, masterclasses and more! Just enter a valid email below.
You can opt-out anytime.
My Instagram Feed
Newsletter
Stay in the loop for new videos and special offers! And receive useful tips. Opt-out anytime.
Created with Systeme.io - Click to build yours for FREE today!